This is a republished post from the original work by Deen Aariff.
Welcome back to this series of tutorials about how to deploy the Pet-Clinic Application on Nirmata!
In Part 1, we managed to get the Pet-Clinic application running on our local machines. After that, we created a repository for each of our Docker Containers on Docker Hub. This will help us to deploy our application on Nirmata.
Getting Started with Nirmata
As a brief reminder, Nirmata is a startup whose goal is bring the power of microservices and efficient container orchestration to all enterprises. The Nirmata platform supplies an easy-to-use interface to enable easy deployment of microservice architectures on the cloud.
You’ll first want to setup an account on Nirmata and connect to a Host provider. Reference this link to connect Nirmata to your specific cloud provider.
Modifying Your Container Images
Before we deploy our application on Nirmata, we’ll want to make a few quick changes to our microservices and their respective Dockerfiles.
Nirmata injects host port information as an environment variable, and we’ll write a few lines of code to convert that into an integer value that Spring Cloud Requires. Because we’re setting the host port in our code, we’ll also set the the host IP address in this step for easy accessibility.
We’ll first be modifying our Eureka Clients (api-gateway, customer, vets, and vistors services). Locate the Dockerile in [the_microservice’s_directory] -> src -> main – > docker -> Dockerfile.
Each Dockerfile contains an entry point — a command to start our application inside of the container.
ENTRYPOINT ["java","-Djava.security.egd=file:/dev/./urandom","-jar","/app.jar"]
In your favorite text editor, remove the line for the entry point in the Dockerfile and replace it with these two commands.
ADD https://raw.githubusercontent.com/deenaariff/Nirmata-Port-Conversion-Script/master/injection.sh injection.sh
RUN bash -c 'chmod +x injection.sh'
Injection.sh is a script to scrape the port value from an environment variable and will pass this port as a String argument into the main class of our microservice.
The first line will ‘add’ the injection.sh bash file to the container when it is built. The second line ensures the script has proper permissions to run.
Don’t worry about providing a new entry point. We’ll specify our run command in our Nirmata application blueprint that will indirectly start our application through the injection.sh script.
To use this argument and set our Host IP Address and Port, we will modify each of our microservices’ main classes.
Before each Spring Application is run in the main method, we’ll want to set a few System properties.
First store the Host Port value, that is the first argument in the array of String arguments.
int PORT = Integer.parseInt(args[0]);
Then, fetch the value of the Host IP Address from the NIRMATA_HOST_ADDRESS Environment Variable.
String IP = System.getenv("NIRMATA_HOST_ADDRESS");
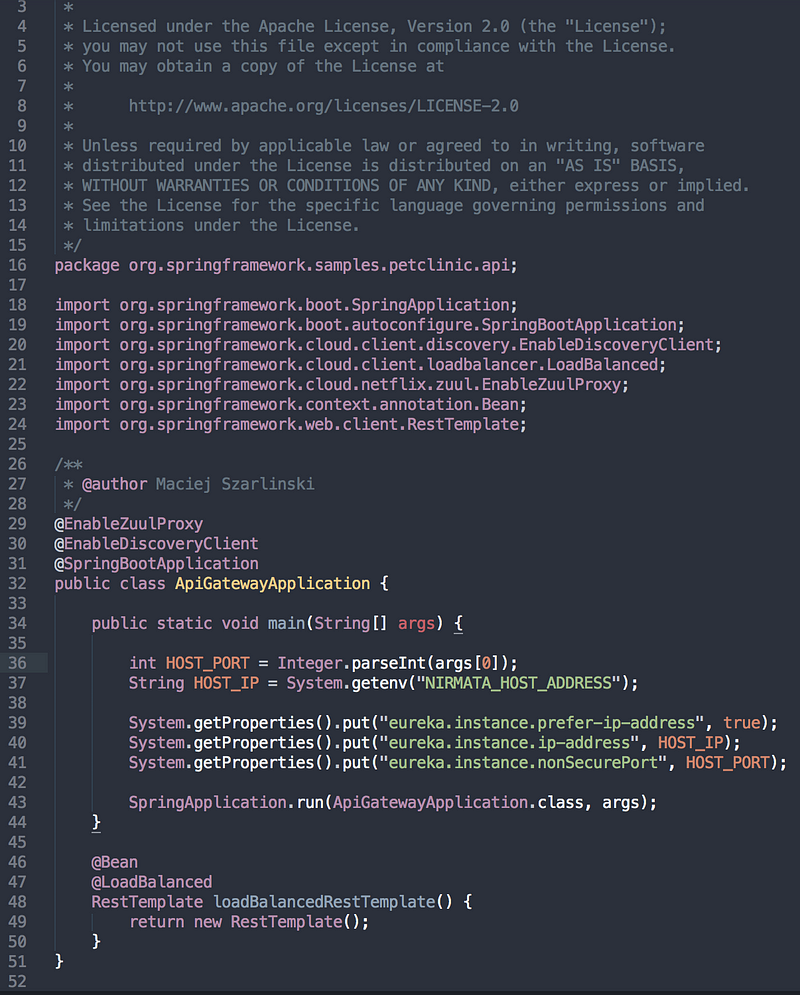
Finally we’ll set the values of our new system properties with the following syntax
System.getProperties().put("eureka.instance.prefer-ip-address", true);
System.getProperties().put("eureka.instance.ip-address", IP);
System.getProperties().put("eureka.instance.nonSecurePort", PORT);
As an example, my modified APIGatewayApplication.java file looks as follows:
We’ll also want to remove the entry point in the Dockerfile of our Discovery-Server, and replace it with.
ADD https://raw.githubusercontent.com/deenaariff/Nirmata-Port-Conversion-Script/master/eureka_wait.sh wait.sh
RUN bash -c 'chmod +x wait.sh'
This will ensure our discovery-server will wait until our configuration server can listen to requests before requesting its configuration file.
Creating Your Application on Nirmata
After connecting to a host provider, you’ll want to create your application on Nirmata.
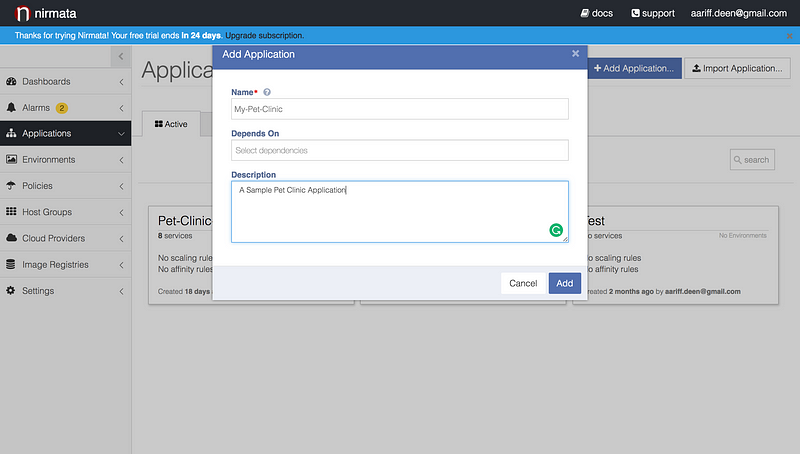
Go to the Applications tab and click “Add Application”. You’ll be able to name your application and provide a brief description.
Next you’ll be taken your applications page. This is where we’ll create our first microservice. Click “Add Service”. You will see the following window.
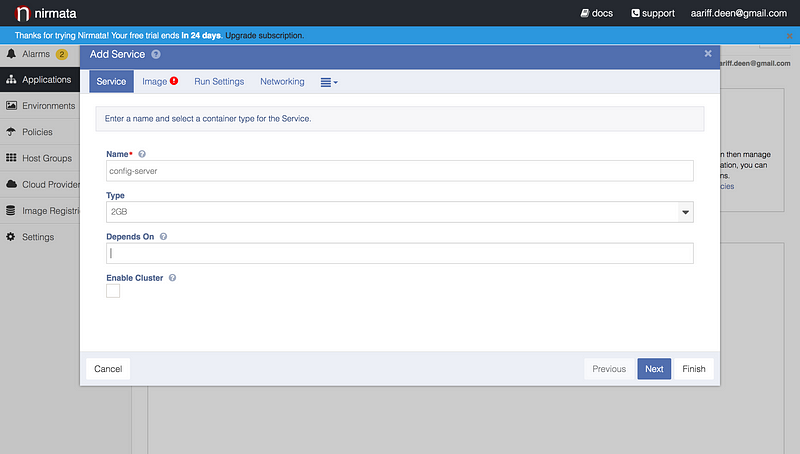
As you can see, I’ve already named my configuration server as “config-server” and have given the container it is running on 2GB of RAM utilization.
I’ve left “Depends On” blank, as the configuration server is the first service to become instantiated in our application. However, you’ll want to set up dependencies for all of your other microservices (more on this in a bit).
Next, click “Image” to specify which repository to pull the container image from. In the “Image Repository Field” enter the [YourDockerHub username]/[Container image repository].

Now, we’ll want to supply the run command for each of our containers to start. Recall, we replaced the point of entry for our Eureka Clients and the Eureka Discovery server and instead provided our own start scripts.
Nirmata provides us an easy way to call these start scripts. For example, to run the injection.sh script in my api-gateway server I provide the following run command.
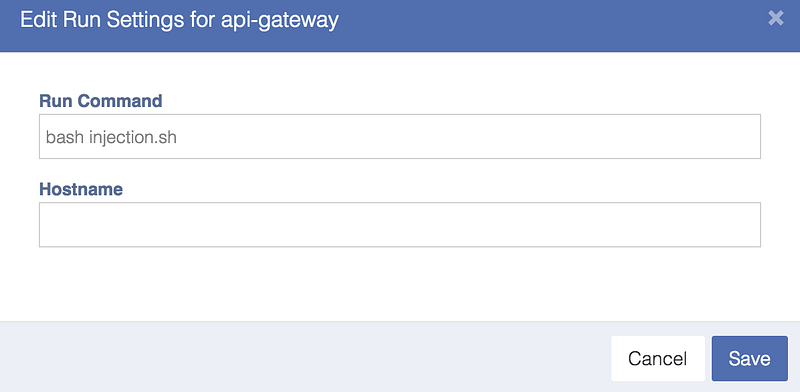
Recall, that we used a different “wait.sh” script for our discovery server. You will have to modify the run settings accordingly. Furthermore, we did not modify the point of entry of our config server and will not have to supply a run command.
Each micro-service determines what container port it is exposed on from a .yml file in a hard coded repository, which is by default set at this link when deploying the app locally and fetched from an environment variable GIT_REPO when deploying in the cloud. Later in the post, we’ll provide a url that links to a cloned and modified version of the repository, enabling us to make some changes to our microservices’ configurations.
The exception to this is the config server, whose port number is hardcoded to 8888 in a boostrap.yml file located in spring-pet-clinic-config-server -> src -> main -> resources.
Therefore, we will specify the field “Container Port” for our config-server microservice as 8888.
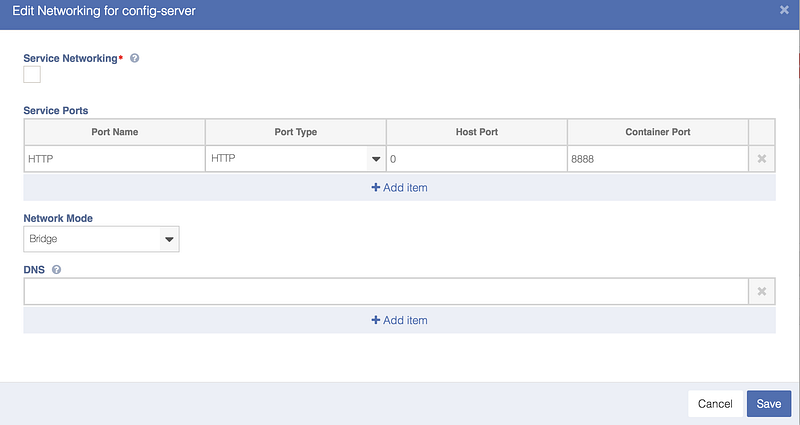
For convenience, we can also specify the Host Port number, and setting the Host Port to 0 will create a dynamic port on our host machine.
Using, the same approach we will create a blueprint for each one of our microservices.
- Config-Server (Container Port # 8888): No dependencies
- Discovery-Server (Container Port # 8761): Depends on Config Server
- Customer-Service (Container Port # 8081): Depends on Config Server, Discovery Server
- Visit-Service (Container Port # 8082): Depends on Config Server, Discovery Server
- Vets-Service (Container Port # 8083): Depends on Config Server, Discovery Server
- API-Gateway (Container Port # 8080): Depends on Depends on Config Server, Discovery Server, Customer-Service, Visit-Service, Vets-Service
You easily check to make sure that you’ve set up your dependencies as you intended by using the “topology” feature available in the Nirmata dashboard.
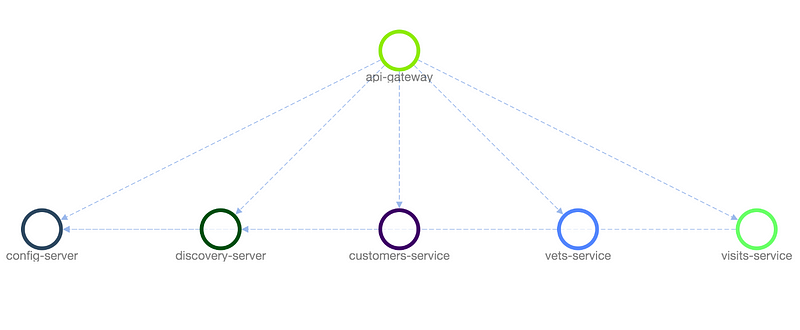
Topological View of Service Dependencies
Great, we’ve defined the blueprint of our microservices application!
Creating Environment Variables and Modifying the Configuration Repository
The next step in our road to deploying our application is ensuring that our configuration setup is correct.
In order to change our configuration, we will first want to create our own copy of the configuration repository. You can fork this repository on Github, and edit your forked version using the Github Web Editor. However, you can also use the repository provided here for this setup.
The first change we will have to make is specifying a value for the environment variable GIT_REPO for the configuration server to find our repository.
To do this we will once again navigate to our application using the Nirmata Dashboard. Then click the tab “Environment Variables” followed by “Click Here to Add an Environment Variable”.

At this step, I specified which services to inject this environment variable into using the services field. Then I specified the key of my environment variable, GIT_REPO. Finally, I specified the url of my forked repository and assigned it to the environment variable.
NOTE: the config server’s boostrap.yml file automatically specifies GIT_URL as the environment variable for the Github repository url.
Next, I will want to edit the configuration of my actual repository.
NOTE: You will only have to do this step if your are setting up your own configuration repository. To do so, forked this repository and push your changes to your forked version.
Since we’ve only concerned ourselves with a select number of the microservices in the Pet-Clinic application, we will only have to modify the files those microservices use.
Now we will make use of the default Environment variables that Nirmata injects into each container by default. For example, NIRMATA_HOST_ADDRESS will map to the address of the host that is exposing the application and its container for consumption by other services. For the full list of these variables read the Nirmata Documentation here.
For example, the configuration for the discovery server can be found in discovery-server.yml.

Within this file, I’ve specified that the discovery server can identify its own Host Address as the default Zone for the Eureka Server. As a side note, the Eureka Server can also register with itself as a Eureka Client. However, we will choose to keep this option disabled by keeping the key “registerWithEureka” set to false.
Our remaining services configuration files will also need to be modified. As an example, here is my modified version of the vets-service file.
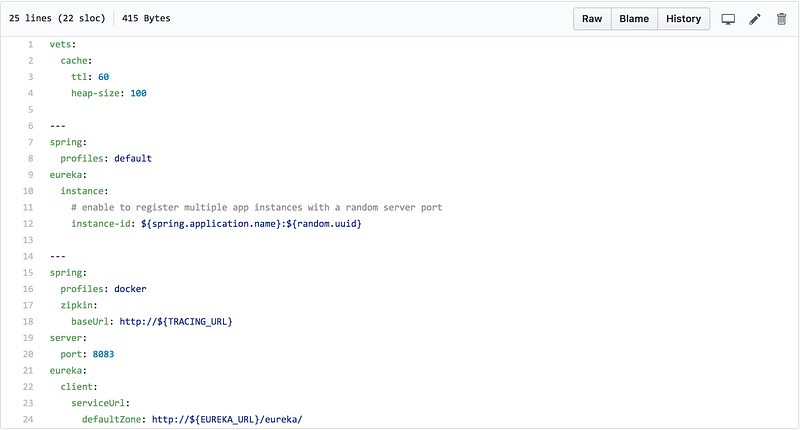
Ignore the zipkin.baseUrl, as this is not pertinent to this tutorial. Notice, however, that I have modified the default zone for the Eureka Client service-url. As mentioned when modifying the Eureka service, this is url through which the vets service will register itself with Eureka.
Note that we must now use a different environment variable as the NIRMATA_HOST_ADDRESS variable injected is different for the vets-service. Instead we will define a variable called EUREKA_URL, which will be used by all of our Eureka Clients.
This makes use Service Dependency Injection, which Nirmata makes surprisingly easy. Through environment variables, we can specify which services we would like to obtain host information about and have the environment variable resolve to the value we need.
For example, I wish to have the EUREKA_URL variable to resolve to the host url + port of the Discovery Server. To do this I will set the value of my EUREKA_URL Variable as follows.
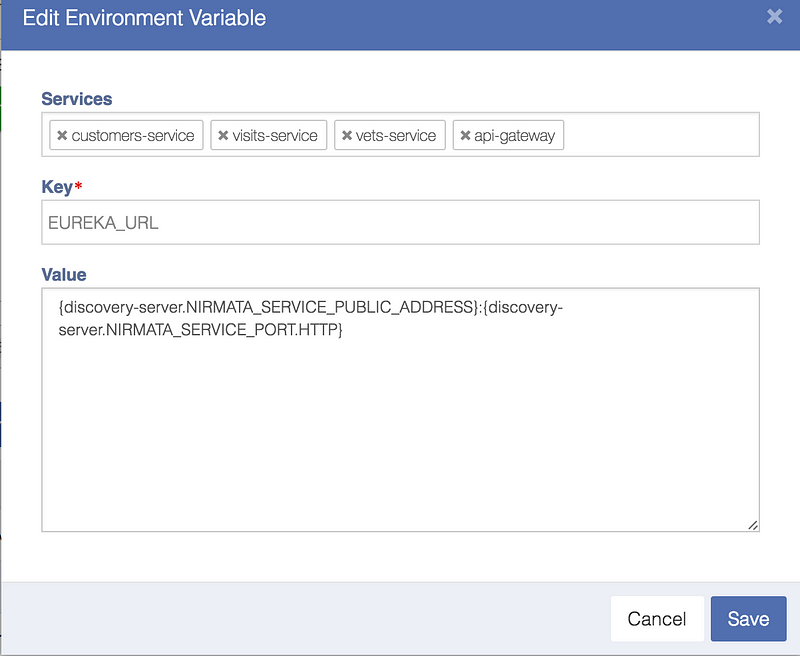
Notice, how I specify my service as the customers-service, visits-service, vets-service, and api-gateway, as these are the Eureka Clients who will use this Environment Variable.
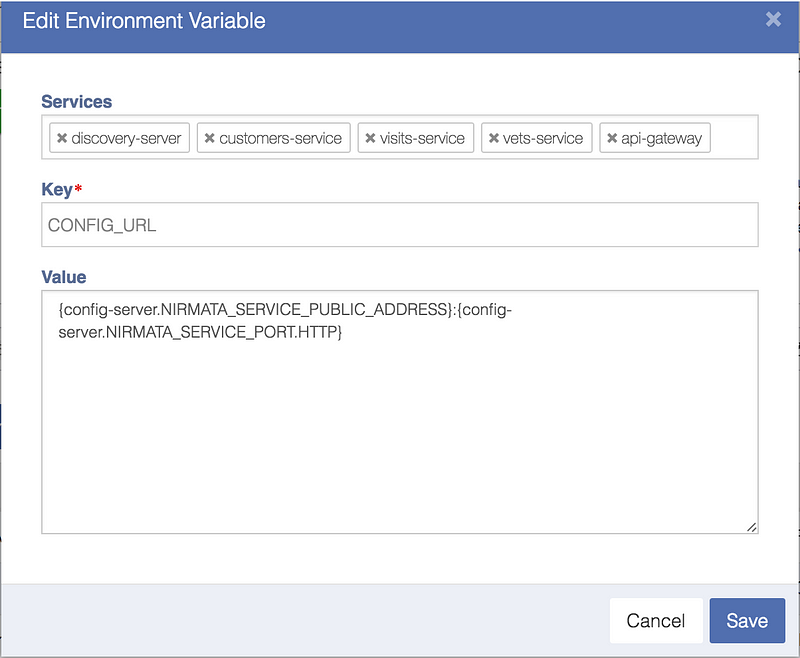
Secondly, each of our microservices rely upon an environment variable named CONFIG_URL to resolve to the IP address and Host of the configuration server.
Deploying Your Application as an Environment
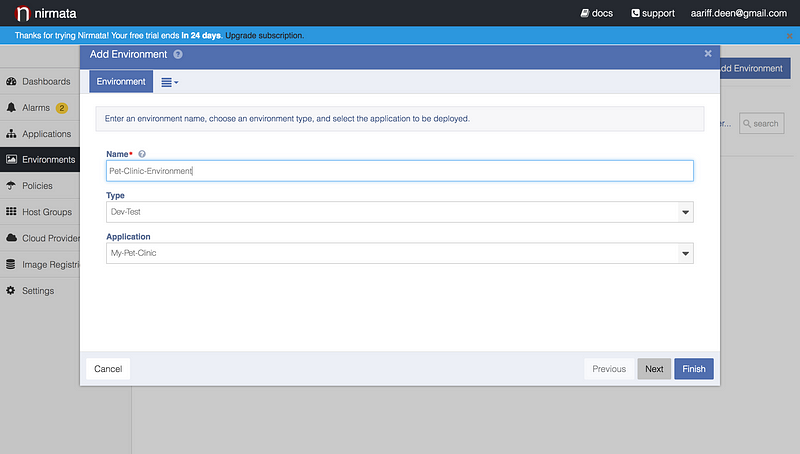
Deploying your application as an environment is simple and painless. Navigate to the “Environment Tab” and click “Add Environment”.
In a matter of seconds, you can specify the name of your environment and which application to deploy.
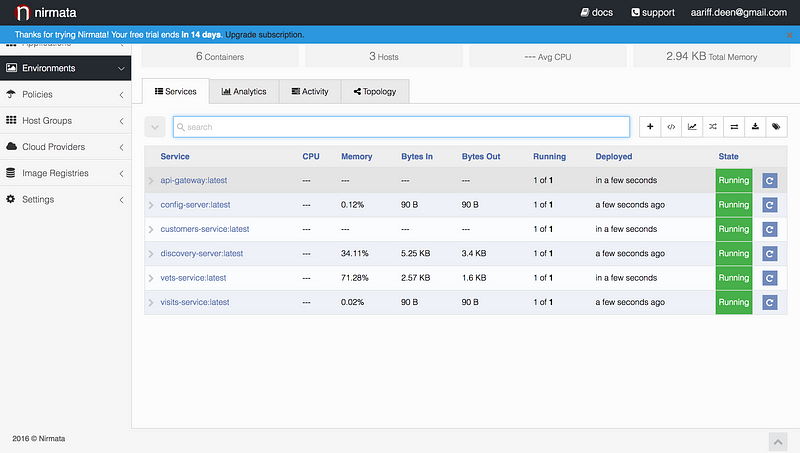
After your environment, is created each microservice will be run in the order they were defined in.
Monitoring and Testing the Application
We’re able to visit our Eureka dashboard, by clicking on the url, in the drop down menu for the discovery server. From here we’ll be able to see each of our microservices register themselves with Eureka.
In the same we demonstrated our application locally, we can visit the api-gateway’s url to use our application!
Scaling Up Our Services
One of the benefits to a microservices architecture is the ease of scaling an individual service to improve the performance or capability of one enterprise capability. Nirmata provides an easy way to create scaling rules for each of our microservices.
As an example, let’s provide a scaling rule for our vets service. Let’s navigate to our environment dashboard and click the scaling tab. Here we can add a scaling policy for our vets service within the environment without affecting our application blueprint.
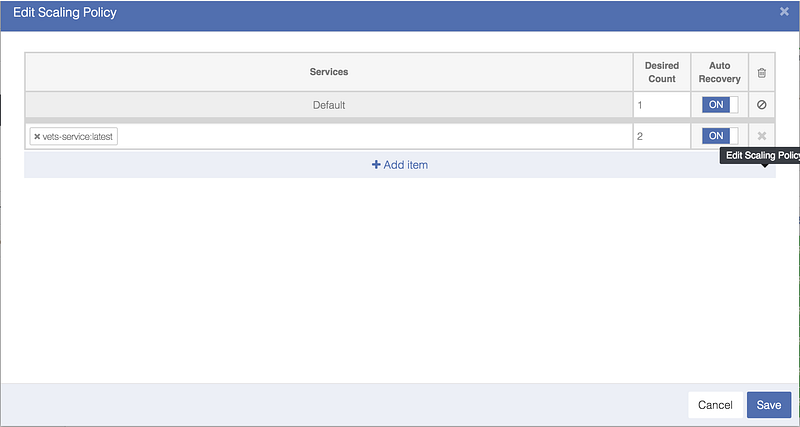
Here we’ve specified the capability of our vets-service to scale up to 2 instances of the service in our environment.
The new instance will then be deployed instantaneously and allocated it’s own Host IP and dynamic port. This will be reflected in our eureka dashboard.
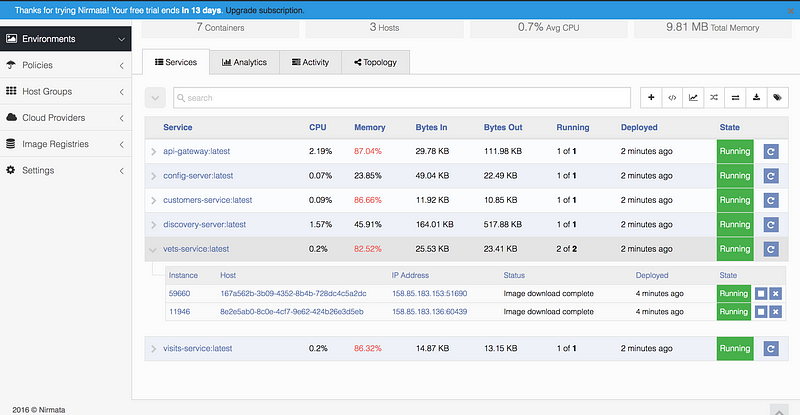
The vets service has been scaled to two instances
If we then, navigate to our eureka (discover-server) dashboard, we’ll be able to see that our dashboard shows two instances of our vets service running.

Two instances of the vets services are being tracked by the discovery server
Enabling Health Checks for Our Services
When deploying a microservices architecture, it becomes increasingly important to ensure each of our services is fully functioning. Setting up the infrastructure to accomplish this presents its own engineering challenges and often requires larger development and/or Dev/Ops teams. Luckily, Nirmata provides an easy way for us to monitor the health of our applications.
Each of our microservices has an REST endpoint “/health” that will return status information about our microservice as a serialized JSON file. We can use the Health Check feature in Nirmata to monitor our application via this endpoint.
In our application blueprint, click on the Health Check tab for a specific microservice. In this example, we’ll be using the api-gateway service.
Here we can specify the type of protocol to use for our health check; we’ll be using HTTP. Additionally, we can provide the path (“/health”) at which to ping the service and specify the start delay should our service typically take an set amount of time to start.

When we deploy our application in an our environment, we’ll always be able to check on the status of our service via the environment dashboard.

In Conclusion
Thank you for making it to the end of Part 2 of this post!
As a recap, we’ve now deployed a fully functioning microservices application on the cloud. In addition, we’ve seen how Nirmata gives us the opportunity to scale our services easily, a feature that is in demand for many medium businesses today.
Throughout the process of deploying this application on Nirmata, I had the opportunity to learn a lot of about microservices and how distributed systems are used in the industry. Additionally, the clear documentation and simple interface offered by Nirmata made translating the process into a blog post a joy as well.
I hope that you have found this article useful, and I would love to hear from you if you have thoughts. Feel free to reach me at aariff.deen@gmail.com.
Until the next time, try out Nirmata and learn how quickly you can manage Microservices or Docker Containers in just under 5 mins!


Sorry, the comment form is closed at this time.